쿠버네티스에 대한 모니터링은 크게 ①쿠버네티스 클러스터에 대한 모니터링, ②클러스터를 구성하는 노드들에 대한 모니터링, ③컨테이너에 대한 모니터링, ④컨테이너 안에서 구동되는 어플리케이션에 대한 모니터링 등으로 구분할 수가 있다.
이 중에서 쿠버네티스 클러스터와 해당 노드들에 대한 모니터링은 OKE에서 제공하는 Built-in 모니터링으로도 확인할 수 있는 내용들이 있다. 먼저 OKE Built-in 모니터링에 대해 살펴본다.
그리고 오픈 소스 Prometheus, Grafana를 이용하여 쿠버네티스 클러스터, 해당 노드, 컨테이너(파드)를 모니터링하는 방법에 대해 살펴볼 것이다.
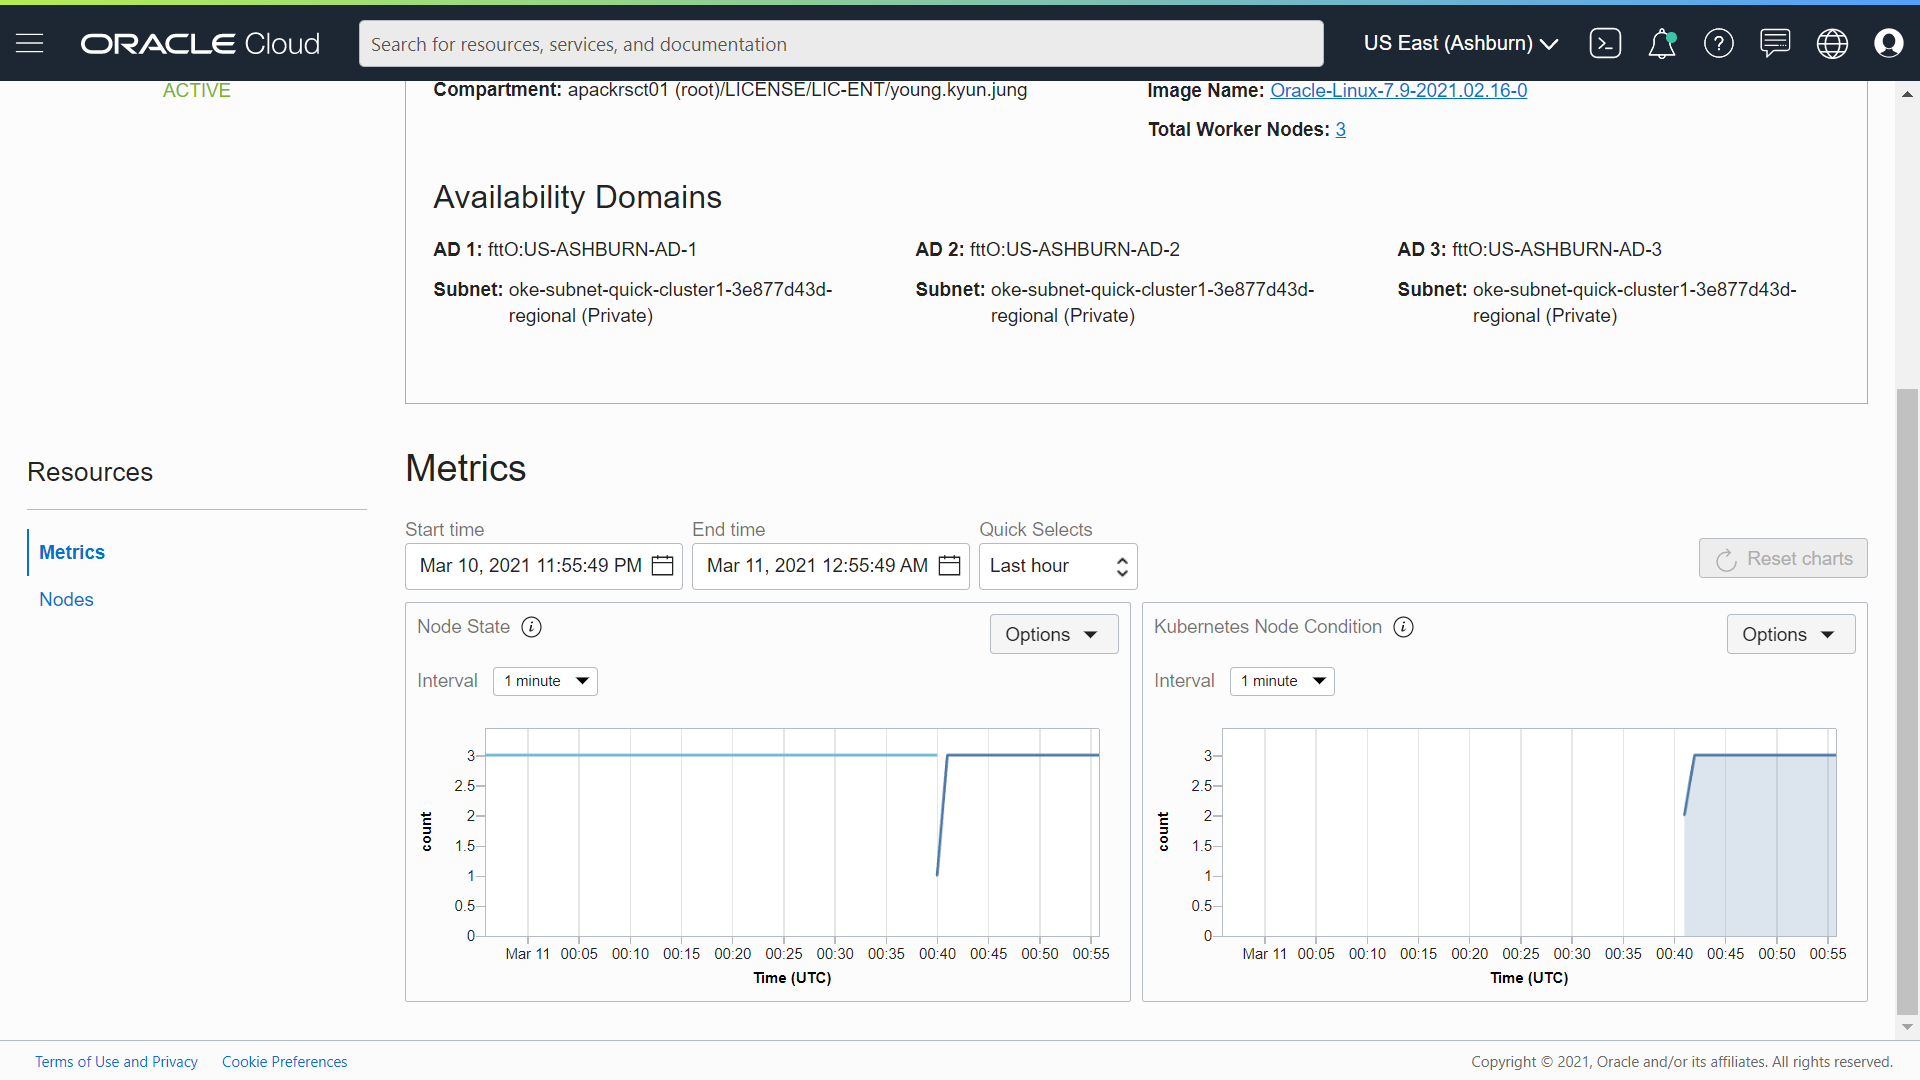
OKE는 관리 콘솔에서 클러스터에 대한 자체 모니터링 기능을 제공한다.
클러스터 상세 화면 하단에 보면 아래와 같이 “API Server Requests”, “API Server Responses”, “Unreachable Pods (파드를 배포하려고 할 때 자원 부족으로 인해 대기 중인 상태를 확인할 수 있는 지표로서, Node Pool 스케일링을 위한 판단 지표로 사용할 수 있음) ”와 같은 메트릭을 그래프로 볼 수 있다.

노드에 대한 모니터링은 할 클러스터 상세화면에서 왼쪽 하단의 Resource의 Node Pools 선택한다. Node Pools에서 확인하고자 하는 노드 풀을 선택한다.

노드 풀에 대해 Active한 노드 수, 쿠버네티스 API 서버가 인식하는 Ready 상태의 노드 수 정보를 확인할 수 있다. 그리고 오른쪽 하단 Resource의 Nodes 화면으로 이동하면 워커 노드들에 대한 정보를 볼 수 있다.

각 워커 노드에서 오른쪽 상단의 “View Metrics”를 클릭하면, 각 노드의 자원 사용 현황을 확인할 수 있다.

워커 노드의 CPU, Memory, 네트웍 등의 자원 사용을 확인한다.

이번에는 Prometheus, Grafana를 이용한 OKE 클러스터 모니터링을 살펴본다.
Prometheus는 2015년 공식 발표된 Go 언어로 개발된 오픈 소스 모니터링 솔루션이다. (Wikipedia - Prometheus) 쿠버네티스 모니터링 뿐만 아니라 애플리케이션이나 서버, OS 등 다양한 대상으로 부터 지표를 수집하여 모니터링할 수 있는 범용 솔루션으로 메트릭을 수집, 모니터링 서비스 디스커버리, 시각화, 알림 등의 기능을 제공한다.
Prometheus와 Grafana를 구성하는 방식은 여러가지가 있을 수 있다. 예를 들어 Prometheus를 쿠버네티스 클러스터에 설치하고 Granfana는 별도 서브넷이나 VCN(이 경우 Local Peering Gateway)에 구성하여 연동하게 할 수 있다. (참조. Monitoring OKE with Prometheus and Grafana)
또는 쿠버테티스 클러스터를 Oracle Management Cloud와 같은 클라우드 벤더 제공 솔루션으로 모니터링 할 수도 있다. (참조. Oracle Management Cloud을 사용하여 Kubernetes에 배치된 애플리케이션 모니터링)
여기서는 Promethus와 Grafana를 OKE 클러스터에 설치하여 쿠버네티스 메트릭을 수집하고 이를 시각화할 것이다. Grafana에 대한 접근은 퍼블릭 로드밸런서를 통해 이루어지도록 구성한다.
먼저 클러스터에 Prometheus 설치를 위해 헬름(Helm) 리포지토리를 추가하는 것인데, 그 전에 헬름에 대해 간략히 먼저 살펴본다. (도서 도커/쿠버네티스를 활용한 컨테이너 개발 실전 입문 (위키북스) 참고)
헬름은 쿠버네티스의 하위 프로젝트로 관리되는 공식 툴로서 여러개의 클러스터에 어플리케이션을 배포할 때 사용하는 패키지 관리 도구이다. 예를 들어 운영과 개발 등 여러개의 쿠버네티스 클러스터를 운영하는 경우, 각 배포마다 API 환경이나 데이터베이스 주소 등이 서로 다르게 가져가야 하는데 이를 수동으로 각 매니페스트 파일을 작성하는 경우, 관리의 어려움이나 사용자 실수 등이 발생하기 쉽다. 따라서 배포 환경에 따라 달라지는 설정값만 정의를 해 둔 다음 이를 배포하는 매커니즘이 필요한데 헬름이 그 역할을 수행한다.

헬름은 차트(Chart)라는 사전에 구성된 쿠버네티스 자원을 묶은 패키지로 패니패스트 파일을 생성하고 이를 통해 쿠버네티스 자원을 관리한다. 차트를 통해 매니페스트 파일을 좀 더 쉽게 할 수 있다. 쿠버네티스의 메니페스트 파일을 생성하는 템플릿이라고 이해할 수 있다.
헬름은 V2까지 클라이언트와 서버로 구성되어 있었고, 서버에 해당하는 것을 틸러(Tiller)라고 했다. 클라이언트는 서버에 명령을 전달하는 역할을 하고, 서버는 클라이언트에서 전달받은 명령에 따라 쿠버네티스 클러스터에 패키지를 설치하고, 업데이트, 삭제 등의 작업을 수행했다. 하지만 V3에 들어서면서 Tiller는 없어지고, 대신 클라이언트에서 Kubernetes API 서버에서 정보를 가져 와서 필요한 정보를 변경하고 쿠버네티스에 설치 기록을 저장하는 방식으로 바뀌었다.
헬름의 패키지(차트)를 저장하는 장소를 헬름 리포지토리라고 하는데 헬름 리포지토리를 헬름 클라이언트가 읽어서 쿠버네티스 클러스터에게 요청을 보내는 구조이다. 로컬 리포지토리인 local, 안정화된 버전이 존재하는 stable, stable 요건에 만족하지 못하는 차트가 존재하는 incubator 등의 리포지토리 종류가 있다.
우선 헬름 설치 스크립트를 다운로드 받아서 실행 권한 부여 후 실행한다. 여기에서는 최신 버전인 Helm V3를 설치한다. 헬름은 kubectl이 사용하는 것과 동일한 kubeconfig 파일 (일반적으로 $HOME/.kube/config에 위치)을 사용한다. 헬름 설치 후 버전을 확인한다.
| [opc@inst-public ~]$ curl -fsSL -o get_helm.sh https://raw.githubusercontent.com/helm/helm/master/scripts/get-helm-3 [opc@inst-public ~]$ chmod 700 get_helm.sh [opc@inst-public ~]$ ./get_helm.sh Downloading https://get.helm.sh/helm-v3.5.2-linux-amd64.tar.gz Verifying checksum... Done. Preparing to install helm into /usr/local/bin helm installed into /usr/local/bin/helm [opc@inst-public ~]$ helm version WARNING: Kubernetes configuration file is group-readable. This is insecure. Location: /home/opc/.kube/config WARNING: Kubernetes configuration file is world-readable. This is insecure. Location: /home/opc/.kube/config version.BuildInfo{Version:"v3.5.2", GitCommit:"167aac70832d3a384f65f9745335e9fb40169dc2", GitTreeState:"dirty", GoVersion:"go1.15.7"} |
헬름 차트 리포지토리를 추가하고 helm repo update 명령으로 로컬에 차크를 업데이트한다.
| [opc@inst-public ~]$ helm repo add prometheus-community https://prometheus-community.github.io/helm-charts WARNING: Kubernetes configuration file is group-readable. This is insecure. Location: /home/opc/.kube/config WARNING: Kubernetes configuration file is world-readable. This is insecure. Location: /home/opc/.kube/config "prometheus-community" has been added to your repositories [opc@inst-public ~]$ helm repo update WARNING: Kubernetes configuration file is group-readable. This is insecure. Location: /home/opc/.kube/config WARNING: Kubernetes configuration file is world-readable. This is insecure. Location: /home/opc/.kube/config Hang tight while we grab the latest from your chart repositories... ...Successfully got an update from the "prometheus-community" chart repository Update Complete. ⎈Happy Helming!⎈ |
차트 리포지토리 추가 후, prometheus를 검색해 보면 관련 차트들을 확인할 수 있다.
| [opc@inst-public ~]$ helm search repo prometheus WARNING: Kubernetes configuration file is group-readable. This is insecure. Location: /home/opc/.kube/config WARNING: Kubernetes configuration file is world-readable. This is insecure. Location: /home/opc/.kube/config NAME CHART VERSION APP VERSION DESCRIPTION prometheus-community/kube-prometheus-stack 14.0.1 0.46.0 kube-prometheus-stack collects Kubernetes manif... prometheus-community/prometheus 13.5.0 2.24.0 Prometheus is a monitoring system and time seri... prometheus-community/prometheus-adapter 2.12.1 v0.8.3 A Helm chart for k8s prometheus adapter … prometheus-community/alertmanager 0.6.0 v0.21.0 The Alertmanager handles alerts sent by client ... |
이제 helm install 명령으로 차트를 쿠버네티스에 배포한다. 위에서 추가한 리포지토리 중 prometheus 설치는 kube-prometheus-stack 차트로 수행한다.
| [opc@inst-public ~]$ helm install prometheus-community/kube-prometheus-stack --generate-name WARNING: Kubernetes configuration file is group-readable. This is insecure. Location: /home/opc/.kube/config WARNING: Kubernetes configuration file is world-readable. This is insecure. Location: /home/opc/.kube/config NAME: kube-prometheus-stack-1615278411 LAST DEPLOYED: Tue Mar 9 08:26:54 2021 NAMESPACE: default STATUS: deployed REVISION: 1 NOTES: kube-prometheus-stack has been installed. Check its status by running: kubectl --namespace default get pods -l "release=kube-prometheus-stack-1615278411" Visit https://github.com/prometheus-operator/kube-prometheus for instructions on how to create & configure Alertmanager and Prometheus instances using the Operator. |
차트에 대한 배포가 끝나면 클러스터에 Proemtheus와 Grafana가 배포된 것을 확인 할 수 있다.
| [opc@inst-public ~]$ kubectl get deploy,po,svc NAME READY UP-TO-DATE AVAILABLE AGE deployment.apps/get-ip 1/1 1 1 71m deployment.apps/kube-prometheus-stack-1615-operator 1/1 1 1 70s deployment.apps/kube-prometheus-stack-1615278411-grafana 1/1 1 1 70s deployment.apps/kube-prometheus-stack-1615278411-kube-state-metrics 1/1 1 1 70s NAME READY STATUS RESTARTS AGE pod/alertmanager-kube-prometheus-stack-1615-alertmanager-0 2/2 Running 0 65s pod/get-ip-bfbc84c6b-74fbt 1/1 Running 0 71m pod/kube-prometheus-stack-1615-operator-8c96c8899-jwptx 1/1 Running 0 70s pod/kube-prometheus-stack-1615278411-grafana-7db8b8f9c9-z4cvl 2/2 Running 0 70s pod/kube-prometheus-stack-1615278411-kube-state-metrics-5748d8bws6d 1/1 Running 0 70s pod/kube-prometheus-stack-1615278411-prometheus-node-exporter-dmjd2 1/1 Running 0 70s pod/kube-prometheus-stack-1615278411-prometheus-node-exporter-llhx4 1/1 Running 0 69s pod/kube-prometheus-stack-1615278411-prometheus-node-exporter-w2gd5 1/1 Running 0 69s pod/prometheus-kube-prometheus-stack-1615-prometheus-0 2/2 Running 1 64s NAME TYPE CLUSTER-IP EXTERNAL-IP PORT(S) AGE service/alertmanager-operated ClusterIP None <none> 9093/TCP,9094/TCP,9094/UDP 65s service/get-ip LoadBalancer 10.96.191.180 193.122.202.94 80:31893/TCP 71m service/kube-prometheus-stack-1615-alertmanager ClusterIP 10.96.135.78 <none> 9093/TCP 70s service/kube-prometheus-stack-1615-operator ClusterIP 10.96.189.52 <none> 443/TCP 70s service/kube-prometheus-stack-1615-prometheus ClusterIP 10.96.116.235 <none> 9090/TCP 70s service/kube-prometheus-stack-1615278411-grafana ClusterIP 10.96.158.32 <none> 80/TCP 70s |
배포된 서비스를 살펴보면 현재 Grafana 서비스 “kube-prometheus-stack-1615278411-grafana”의 경우, 서비스 타입이 ClusterIP로 클러스터 외부에서 접속이 불가하다. Grafana 엔드포이트를 외부로 노출시키기 위해 여기서는 로드밸런서를 이용할 것이다.
아래 kubectl 서비스 수정 명령으로 Grafana 서비스 매니페스트 파일을 열어서 annotation 부분과 타입 부분을 아래와 같이 수정한다. 아래 #로 주석 처리된 부분이 기존 내용이다.
| [opc@inst-public ~]$ kubectl edit svc kube-prometheus-stack-1615278411-grafana … # Please edit the object below. Lines beginning with a '#' will be ignored, # and an empty file will abort the edit. If an error occurs while saving this file will be # reopened with the relevant failures. # apiVersion: v1 kind: Service metadata: # annotations: # meta.helm.sh/release-name: kube-prometheus-stack-1615278411 # meta.helm.sh/release-namespace: default annotations: service.beta.kubernetes.io/oci-load-balancer-backend-protocol: HTTP service.beta.kubernetes.io/oci-load-balancer-shape: 100Mbps creationTimestamp: "2021-03-09T08:27:06Z" labels: app.kubernetes.io/instance: kube-prometheus-stack-1615278411 app.kubernetes.io/managed-by: Helm app.kubernetes.io/name: grafana app.kubernetes.io/version: 7.4.2 helm.sh/chart: grafana-6.4.8 name: kube-prometheus-stack-1615278411-grafana namespace: default resourceVersion: "41641" selfLink: /api/v1/namespaces/default/services/kube-prometheus-stack-1615278411-grafana uid: ff455193-9e9b-4eed-9de8-f71be1df442f spec: clusterIP: 10.96.158.32 ports: - name: service port: 80 protocol: TCP targetPort: 3000 selector: app.kubernetes.io/instance: kube-prometheus-stack-1615278411 app.kubernetes.io/name: grafana sessionAffinity: None # type: ClusterIP type: LoadBalancer status: loadBalancer: {} |
Grafana 서비스 수정 후, 잠시 기다리면 서비스 타입이 ClusterIP에서 LoadBalancer로 변경되었고, EXTERNAL-IP가 잠시 <pending> 이었다가 IP가 추가된 것을 알 수 있다. OCI에 로드밸런서가 배포되어야 IP를 얻을 수 있다. 80포트에 대한 포트포워딩도 추가되었다.
| [opc@inst-public ~]$ kubectl get services NAME TYPE CLUSTER-IP EXTERNAL-IP PORT(S) AGE alertmanager-operated ClusterIP None <none> 9093/TCP,9094/TCP,9094/UDP 22h get-ip LoadBalancer 10.96.191.180 193.122.202.94 80:31893/TCP 23h kube-prometheus-stack-1615-alertmanager ClusterIP 10.96.135.78 <none> 9093/TCP 22h kube-prometheus-stack-1615-operator ClusterIP 10.96.189.52 <none> 443/TCP 22h kube-prometheus-stack-1615-prometheus ClusterIP 10.96.116.235 <none> 9090/TCP 22h kube-prometheus-stack-1615278411-grafana LoadBalancer 10.96.158.32 129.159.113.215 80:30638/TCP 22h kube-prometheus-stack-1615278411-kube-state-metrics ClusterIP 10.96.124.21 <none> 8080/TCP 22h kube-prometheus-stack-1615278411-prometheus-node-exporter ClusterIP 10.96.36.128 <none> 9100/TCP 22h kubernetes ClusterIP 10.96.0.1 <none> 443/TCP 25h prometheus-operated ClusterIP None <none> 9090/TCP 22h |
이제 Grafana서비스의 EXTERNAL IP로 웹브라우저를 열어서 접속하면 Grafana 웹 UI에 접속할 수 있다.
Grafana 웹 UI의 유저명은 admin 이다. 패스워드는 Prometheus, Grafana 설치와 함께 생성된 Grafana 시크릿으로부터 얻어와야 하는데, 아래 명령으로 패스워드를 가져온다.
| [opc@inst-public ~]$ kubectl get secrets | grep grafana kube-prometheus-stack-1615278411-grafana Opaque 3 27h kube-prometheus-stack-1615278411-grafana-test-token-nk4sb kubernetes.io/service-account-token 3 27h kube-prometheus-stack-1615278411-grafana-token-74f5z kubernetes.io/service-account-token 3 27h [opc@inst-public ~]$ kubectl get secret kube-prometheus-stack-1615278411-grafana -o jsonpath="{.data.admin-password}" | base64 --decode ; echo prom-operator |
Grafana 서비스 EXTERNAL-IP로 웹 UI에 접속한 다음, 유저명 “admin”, 패스워드는 위에서 “kubectl get secret” 명령으로 얻어온 값으로 로그인한다.

kube-prometheus-stack 차트로 설치하여 Grafana를 접속하면 이미 Prometheus와 Grafana의 연동이 이루어져있다. Grafana에서는 Prometheus에서 수집한 정보를 대쉬보드로 구성만 하면 된다.

오른쪽 대쉬보드 메뉴 아래 Manage 화면으로 이동하면 prometheus가 수집한 다양한 쿠버네티스 메트릭에 대한 대쉬보드들을 확인할 수 있다. 아래는 클러스터 노드의 자원 사용 현황 화면이다.

아래는 파드에 대한 메트릭 정보에 대한 대쉬보드이다. 앞서 Wercker로 배포한 파드 “get-ip”를 포함하여 파드들의 CPU, Memory, 네트웍(화면 하단) 자원 사용에 대한 모니터링을 할 수 있다.

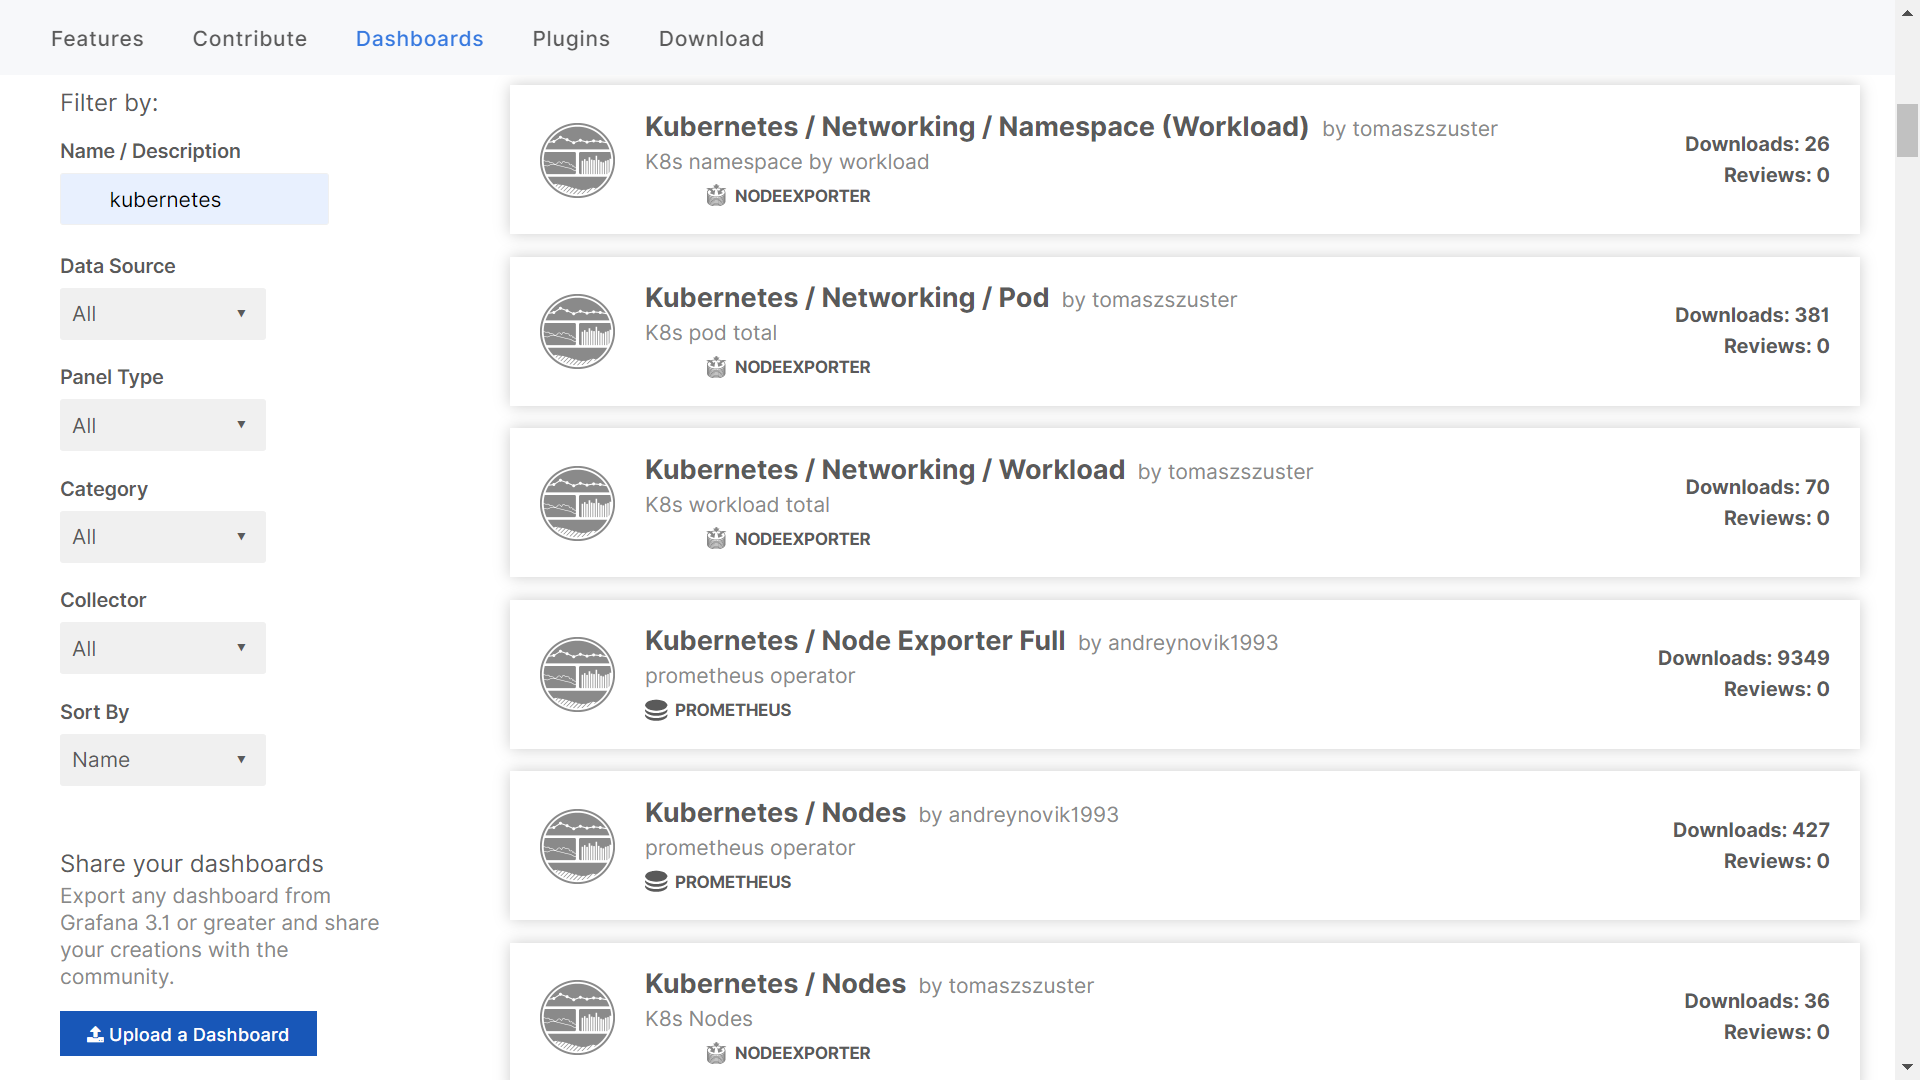
Grafana에서는 Prometheus에서 수집한 메트릭을 이용하여 사용자가 대쉬보드를 만들어서 사용할 수 있으나, 이미 다른 사용자가 만들어서 Grafana 홈페이지에 올린 대쉬보드를 임포트하혀 사용할 수도 있다. 사용 방법은 먼저 Grafan 홈페이지 대쉬보드 화면 (https://grafana.com/grafana/dashboards)으로 이동한다.

대쉬보드 화면 하단의 필터 조건에 “kubernetes”라고 입력하면 다른 사용자가 업롣한 쿠버네티스 모니터링 대쉬보드들을 볼 수 있다. 이 중 임포트하고자하는 대쉬보드를 클릭한다.

임포트 대상 대쉬보드 화면 오른쪽에 하단에 대쉬보드 ID가 있고, 그 아래 “Copy ID to Clipboard” 버튼이 있다. 이를 클릭하여 대쉬보드 ID를 복사한다.

Grafana 웹 UI로 돌아와서 오른쪽 “+” 클릭하면 나오는 Create 메뉴의 Import를 클릭한다. 임포트 화면에서 복사한 대쉬볻 ID를 입력 후, 오른쪽의 Load 클릭한다.

위에서 Load 버튼을 클릭하면 화면 하단에 데이터 소스를 선택하는 부분이 나오는데, 데이터 소스 선택 박스에서 “Prometheus”를 선택 후 Import 클릭하면 대쉬보드가 로딩된다.

글 순서
5. OCI 레지스트리에 이미지 업로드 & 다운로드 설정
여기에 정리한 내용은 오라클 제품을 다루고 있지만, 이는 개인적인 정리 및 테스트 결과일 뿐입니다. 오라클의 공식 문서는 오라클이 제공하는 매뉴얼과 기타 기술문서를 참조하셔야 합니다.
'Cloud > Oracle Cloud Infrastructure' 카테고리의 다른 글
| OCI를 이용한 쿠버네티스, Wercker 쉬운 샘플 - 7. Wercker를 이용한 어플리케이션 배포 (0) | 2021.03.22 |
|---|---|
| OCI를 이용한 쿠버네티스, Wercker 쉬운 샘플 - 6. Wercker를 이용한 어플리케이션 빌드 (0) | 2021.03.22 |
| OCI를 이용한 쿠버네티스, Wercker 쉬운 샘플 - 5. OCI 레지스트리에 이미지 업로드 & 다운로드 설정 (0) | 2021.03.22 |
| OCI를 이용한 쿠버네티스, Wercker 쉬운 샘플 - 4. OKE 클러스터에 샘플 웹서버 배포 (0) | 2021.03.17 |
| OCI를 이용한 쿠버네티스, Wercker 쉬운 샘플 - 3. OCI 쿠버네티스 배포, 사용 환경 설정 (0) | 2021.03.17 |


